How to capture inspections, finalize reports, manage users and modules, and get the most out of Apex Field Reports.
Apex Field Reports helps field-service inspectors document their work and produce professional reports for clients in minutes instead of hours.
Every company on Apex Field Reports gets its own isolated workspace at yourcompany.apexfieldreports.com. Your inspections, photos, and reports are stored in a dedicated database, separate from every other customer.
yourcompany.apexfieldreports.com/app for the field app and your team will always land in the right place.Apex Field Reports ships a growing catalog of inspection modules. Each is a full-featured editor with the fields, units, and finalize-time PDF tuned to that discipline. Currently shipping:
Subscribe to any combination — see Subscribing to modules. Each module add-on is billed at your tier's per-module rate and comes with a 7-day free trial.
Every inspection in Apex Field Reports belongs to a Site. A Site is the property itself — the address, the contact, any site-level notes (gate code, pet warnings, parking instructions) that should follow the property across every visit instead of being re-typed each time.
Sites are the workspace home. From the Sites list you can:
Sites are discipline-agnostic: one site can hold roofing, pool, HVAC, and plumbing visits side by side. A property manager running multiple trades at one address sees one site with mixed visit history, not several disconnected lists.

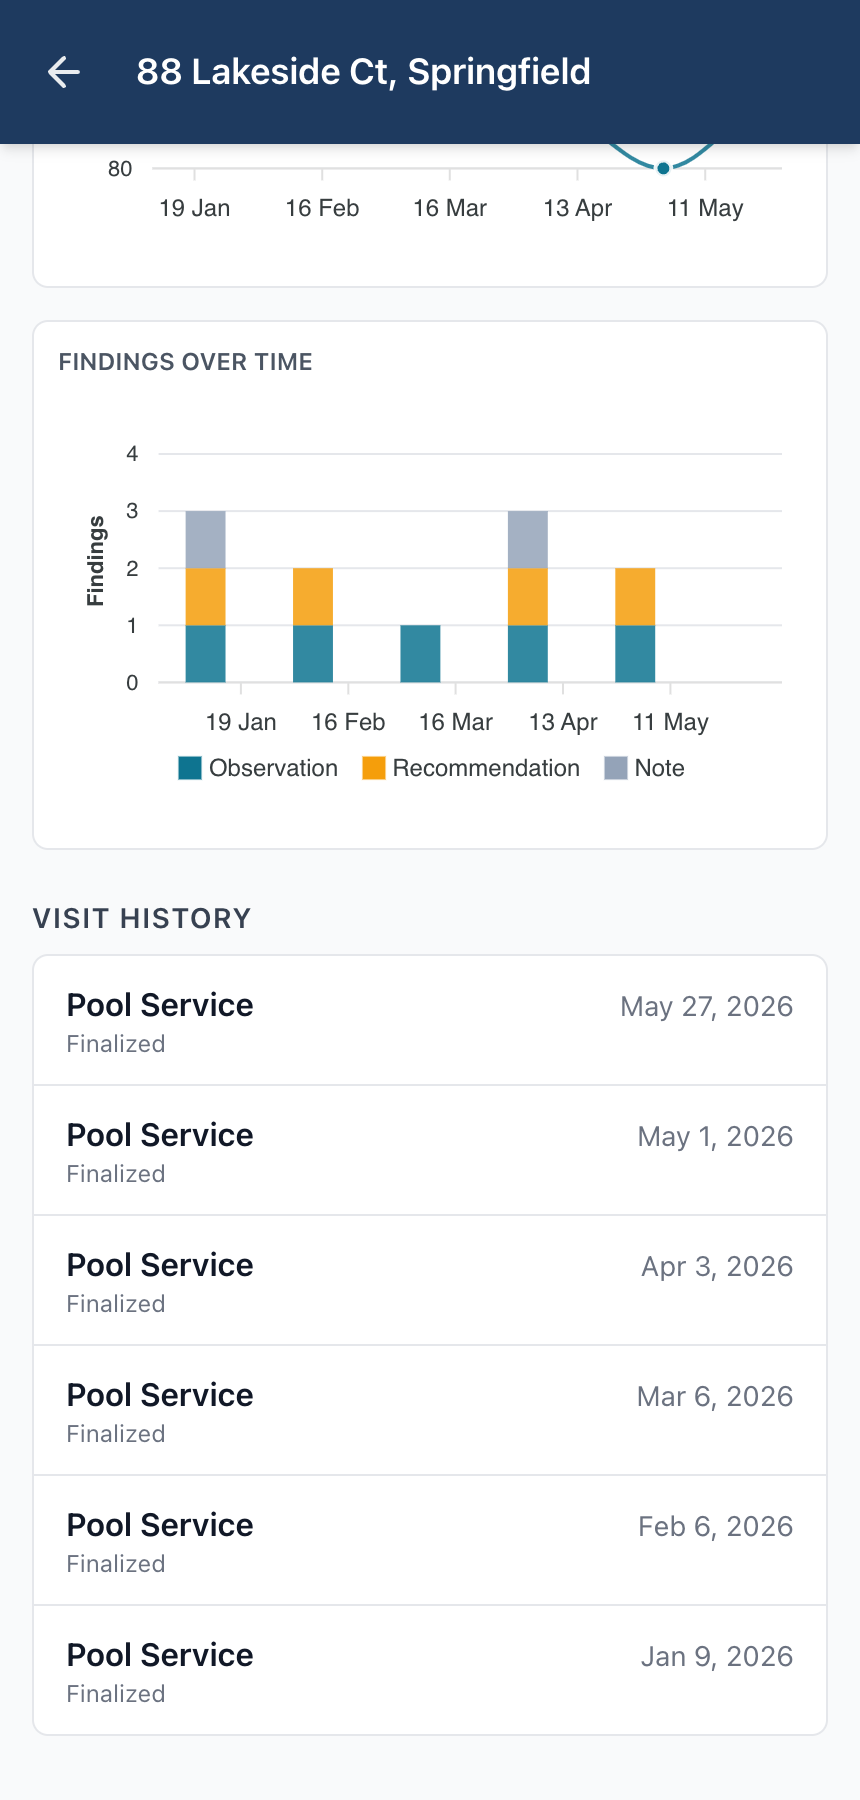
When a site has two or more visits, Apex Field Reports starts drawing trend charts on the site detail page:
Each finalized PDF carries the same trends as an appendix on the last page. The client gets the day's report and the long-arc context in one document — no separate dashboard login, no copy-pasting screenshots into emails.
From the Sites list, open the site for the property you're inspecting — or tap Add site if you haven't recorded it yet. Then tap + New visit on the site detail page. You'll be asked for the field tech's name and an inspection date; the property address and FM identifier come from the site automatically. If your account is granted more than one module, you'll also pick which discipline this visit belongs to.

The editor adapts to the discipline you chose when starting the visit. Each module ships its own structured form tuned to that trade — so an HVAC tech sees superheat and subcool, a plumber sees static pressure and water-heater age, an electrician sees split-phase voltages and panel temperature. The layout follows the same shape across every module:
Roofing is the one module that breaks this shape: a property can have multiple distinct roof systems, so the roofing editor opens with a primary Predominant Roof section and lets you add an optional Secondary Roof section. Edits autosave as you go — there's no Save button to remember.
Photos can be uploaded directly from your phone or computer. Add a caption to give the photo context — what room, which corner of the roof, which station number. On roofing inspections, photos can also be tagged to a specific roof section so they appear next to that section in the PDF. On other modules, photos are listed in capture order.
Long-form text fields — damage notes, recommendations, technician notes, equipment notes — support voice dictation. Tap the microphone icon next to the field and speak. Apex transcribes your speech directly into the field, so you can keep your hands free on the jobsite. Dictation works in Chrome and Safari; on iOS, it works in Safari when you've added Apex Field Reports to your home screen.
Findings are categorized as observations (what you saw), recommendations (what should be done), or notes (additional context). Add as many as you need; they appear in a numbered list in the finalized report.
AI enhancement is available on Pro and Business plans. It turns your raw field notes into a polished, client-ready summary plus rewritten findings, using your inspection data and photos as input. To enable AI on your workspace:
You don't need to bring an API key — Apex manages provider integrations for you. AI usage is included up to fair-use limits. On any draft inspection, the Review & Finalize screen shows an Enhance with AI button. The AI version appears alongside your original — you always review before accepting, and you can reject it and keep your original content instead.
Inspections move through three states:
Each module ships with a complete inspection form, but you can tailor it to the way your shop works. From Modules → Edit fields (Owner or Office only), you can:
Each module is configured independently, so your roofing form and your HVAC form can look nothing alike. Changes apply to every inspector across the workspace as soon as you save — there's no app update or reinstall.
In Workspace settings → Branding, you can upload your company logo and configure a four-color palette: primary, secondary, accent, and background. These appear on the cover header of every PDF and throughout the document. Supported logo formats: PNG, JPEG, SVG, and WebP, up to 2 MB. Available on all plans.
Apex Field Reports has three roles:
Starter includes 3 users, Pro includes 10, Business is unlimited. Each user is granted a subset of the workspace's subscribed modules — a roofer doesn't need pool-chemistry fields, and a lawn-care tech doesn't need HVAC data. Owners manage per-user module grants from the Users screen.
Workspace owners manage module subscriptions from Workspace settings → Modules. Every new module subscription starts with a free 7-day trial; cancel before day 7 and you're never charged. After the trial converts, the module is billed at your plan's per-module rate ($24.50 / $49.50 / $99.50 monthly for Starter / Pro / Business), prorated for the partial period.
Unsubscribing is also self-service: the module's charge stops, unused time is credited, and existing inspections stay readable as a permanent record — but new work in the canceled module is blocked until you re-subscribe. Re-subscribing a previously-canceled module skips the trial (one trial per module per workspace).
Each workspace has a monthly inspection limit and a user limit based on the plan. See your current usage in Workspace settings → Plan & usage.
Email [email protected] and we'll get back to you within one business day.
Start a 7-day free trial, pick a module, and run your first inspection today — no charge until day 7.